HELP CENTER / MY PROFILE
View and edit My Profile
Select your name in the upper-right corner, then select My Profile . Open a tab to view or edit its settings. Ask your broker or manager about grayed-out fields.
Open My Profile

Personal info and dashboard preferences
Here, you can review personal information such as your first and last name, email, mobile number, the offices or teams you belong to, time zone and language preference, and a section to enter your bio.
NOTE: Fields that are grayed out are locked. To make edits to these fields, please contact your Broker or Manager.
Contact Email Address:
This is the email that Contacts will see as the “ From ” when they receive an email from you.

Dropbox Email Address:
You can forward existing threads or new emails created in a different email application to this email address.
- You can also BCC this email address when emailing customers.
- This will look up existing customers or create new customers inside TotalBrokerage by scanning the email thread.
Calendar Feed Link:
You can one-way sync your TotalBrokerage calendar into your personal calendars.
- You will want to copy the address/URL and Save it to your computer by clicking the clipboard icon.
- Click the Info button, which will give you instructions for adding your TotalBrokerage calendar to your personal calendar.

Click on your calendar type for detailed setup instructions:

Follow the instructions and paste the calendar feed link as directed.
Language:
Select your desired language from the options in the dropdown in the picture below.
Dashboard Type: Select your preferred dashboard view:
Full – Access all dashboard widgets and the complete sidebar menu.
Simple – A streamlined view focused on your transactions. Create new transactions, view existing ones, or switch back to the Full dashboard at any time.
Brokerage (Brokerage Managers only) – View key brokerage performance metrics at a glance, including Volume & Commissions, Agent Count, Net Broker Income, Closed Transactions, and New Transactions.

Details and files
DETAILS:
In most cases, Account Details are created by answering the Onboarding Questionnaire questions. You can view your Details at any time and can update them as needed.*
* NOTE: Fields that are grayed out cannot be modified by the user. Please reach out to your Broker or Manager to update this information.

FILES:
The Account Files are created by signing, filling out, or uploading any files in the Onboarding Questionnaire questions.
You are able to view your Files at any time and update them as needed.
Email and SMS
Here you will set up your email signature and SMS Signature and SMS Configuration, if included in your Plan.
Email Signature:
You can create your email signature using text, images and links.
If you have HTML code that you want to import, click the <> icon in the toolbar and paste in the code.

SMS Signature:
Create your SMS signature using text to end your text messages.

When you are finished creating your Signature(s), click Save .
SMS Configuration:
If included in your Plan, you can activate an SMS number to be used for texting your customers from TotalBrokerage. Texts to and from your customer will be saved in the History tab of the CRM
In your SMS Messaging tab, you will see a list of all active and all previously activated SMS numbers for your account. 
- To add a new SMS number, Click + Activate a Number
- You can select various search criteria to narrow down your choices for a number.
You can use the Area Code, City, or even digits within the phone number.
Toll-free numbers are not available.

- To search, you enter the parameters, and a list of numbers is displayed in the Select A Number box.
Select your desired number and click Activate .
Once you activate a phone number, you may not deactivate it for one month.
If you deactivate a phone number, it is impossible to reactivate it.
To prevent your number from being deactivated, you must have SMS activity at least once every 30 days.
If a number is deactivated, a new one must be activated, and the registration process must be restarted.
Notifications
The Notifications tab allows you to customize how you receive updates about important system events.
You can choose to get notifications via email, SMS, or both, for events such as reminders, new lead alerts, and more.
Notification events are organized into the following categories: General, Contacts, Transactions, and Message Board.
- Choose the events you'd like to receive email notifications for in the Email column.
- The SMS column can only be used if your brokerage opts for SMS notifications.
- Click Save at the bottom of the page.

Commission and fee plans
COMMISSION PLANS:
View all your commission plans here.
- For each plan, you ' ll see its name, description, and type, along with key dates such as the start and end dates.
- If the plan is tiered, you ' ll also see details like the reporting basis, whether it resets on the anniversary of the plan, and when transaction income is counted.
- If the plan is currently active and tiered, your current contribution to the plan will be displayed as well.
FEE PLANS:
View your fee plans here, so you can see which credits or deductions will apply to your transactions.
Bulk actions and onboarding
BULK ACTIONS:
This is where you can view a log of all the contacts, vendors, and documents that you have uploaded.
ONBOARDING:
The Onboarding tab displays all Onboarding Questionnaires assigned to you.
This is a record of your completed and in-progress onboarding questionnaires.
You can view, download, or resume any questionnaires at any time.
Security and Outlook
Change your password, set up 2FA (Two-Factor Authentication), and connect your Microsoft Outlook Calendar here.
Click Change Password .
- Type in your Current Password .
- Type your New Password
- Type it in again to Confirm New Password
- Be sure to click “ Submit ” when finished.
Click Enable Two-Factor Authentication
- Follow the prompts
- Click Submit

Microsoft (Outlook)
Click Connect to Microsoft and follow the prompts.
Once connected, you will see the following and all of your Microsoft Outlook calendar events displayed in your TotalBrokerage calendar.
Dotloop
Enable Automatic Dotloop Sync
Disable Automatic Dotloop Sync
Connect to Dotloop
Disconnect from Dotloop
Here you will connect your TotalBrokerage Account to your Dotloop Account.

Log into your Dotloop (Zillow Workspace) Account and follow the prompts.
Accounting
Here is where you ' ll set up your banking information so you can be pay your brokerage invoices and receive your commission payments.
Click + Add New Payment Method and follow the prompts
Select your Bank - you will then be prompted to Log In to your bank ' s website to access your account and approve the connection.
Congratulations! You have set up your Payment Method and will see the information in your profile. You can also add a new payment method if needed.

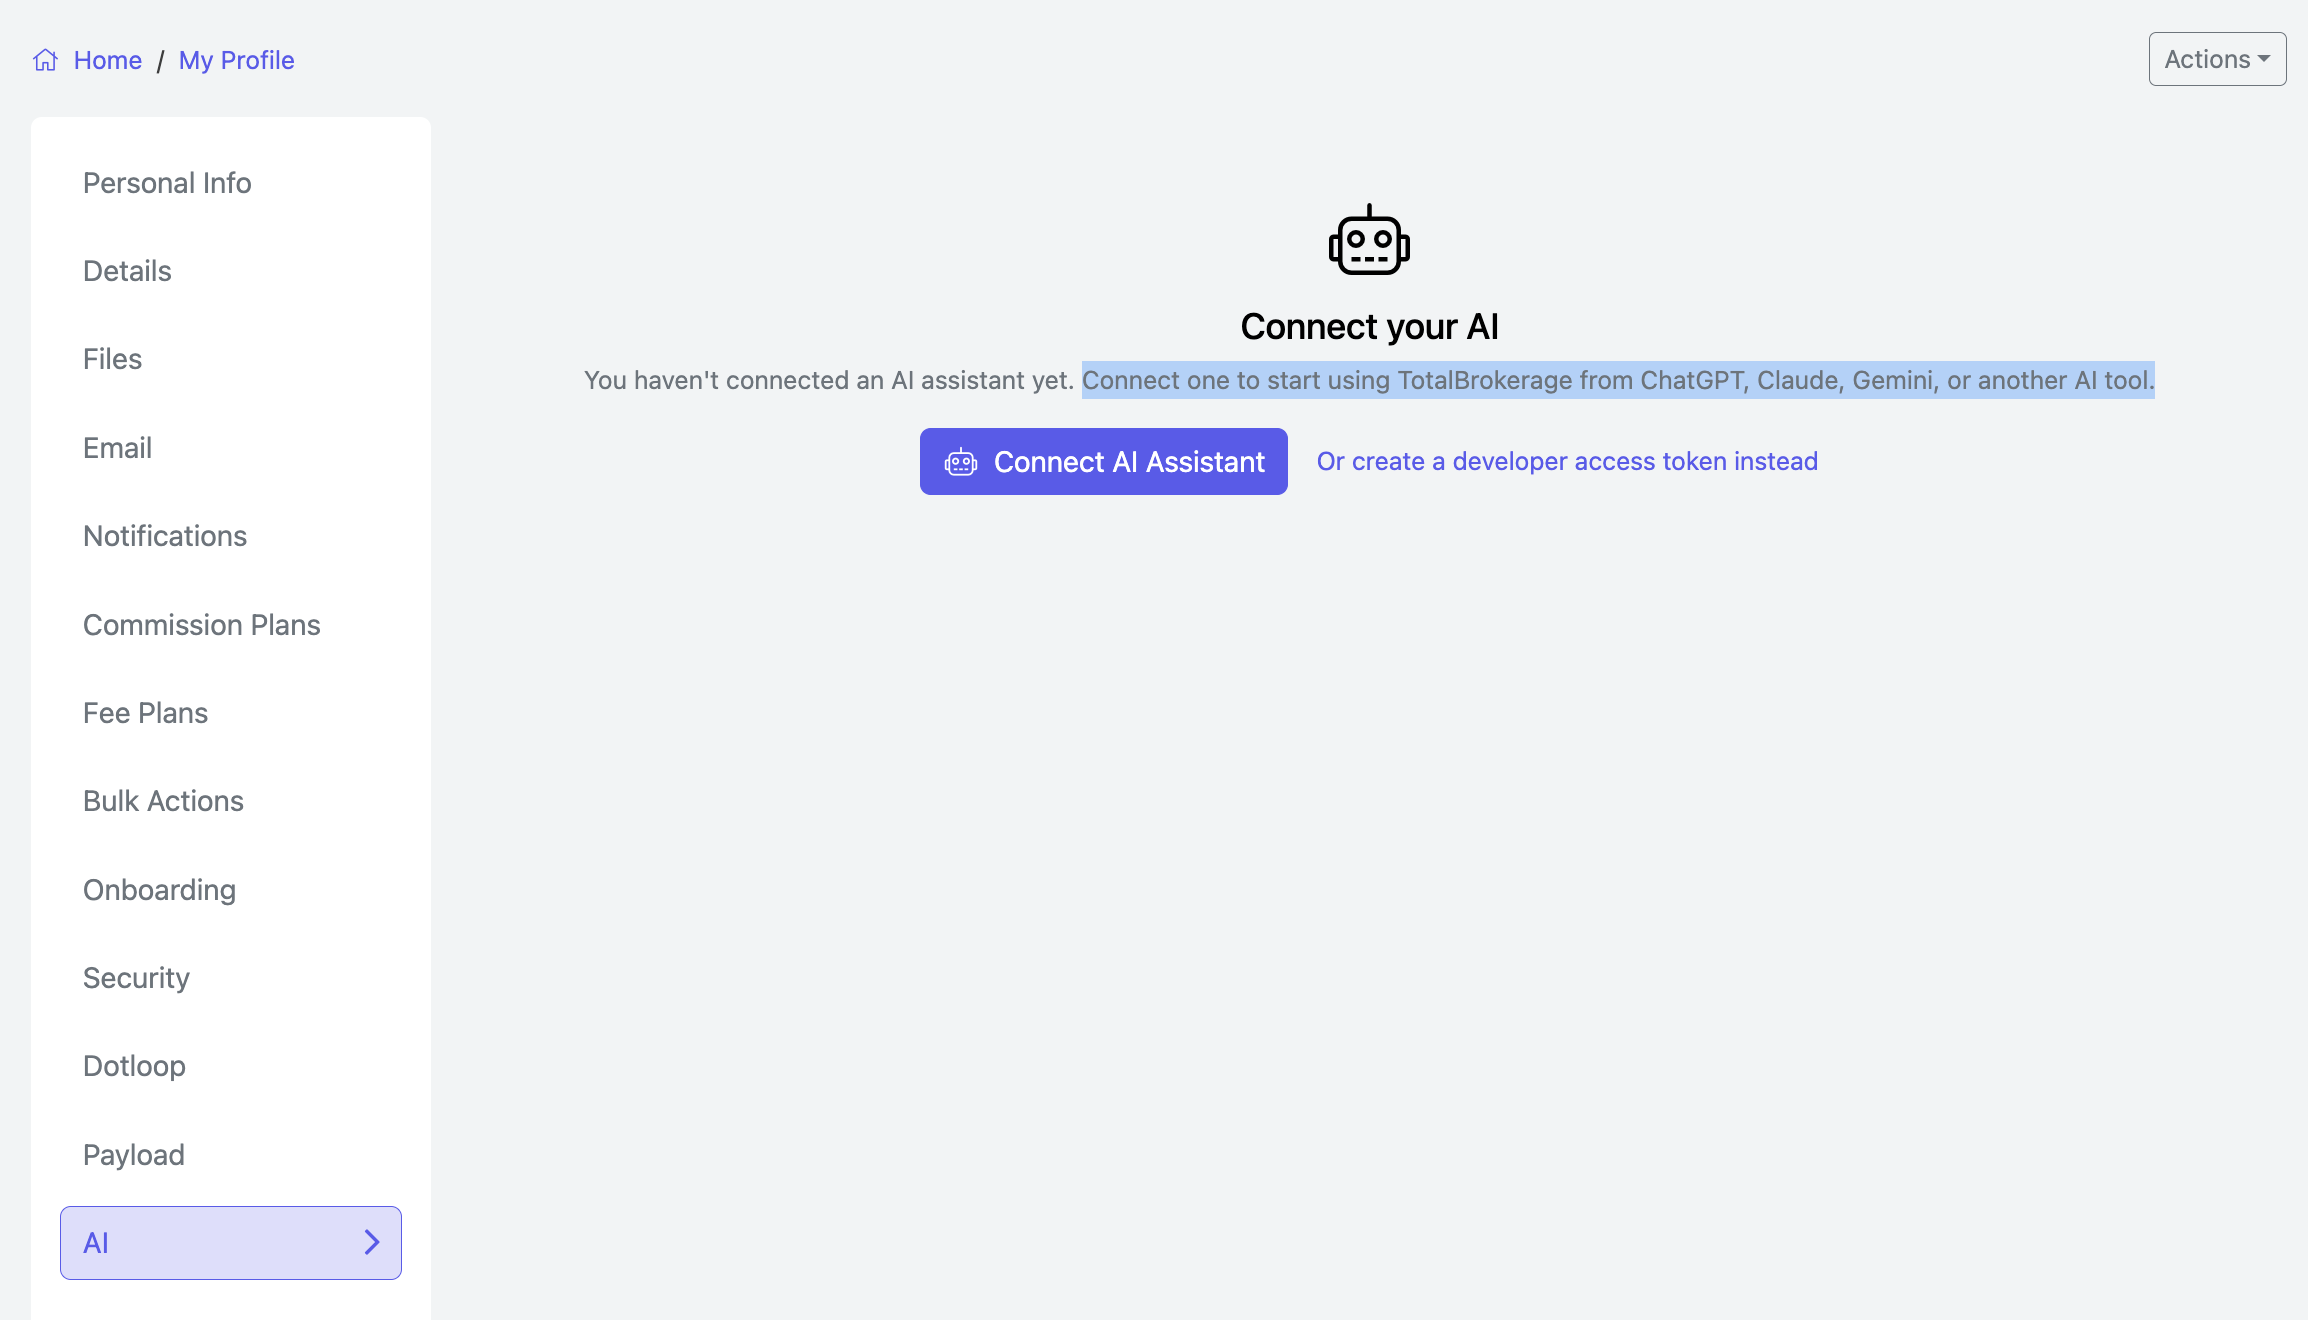
AI
Click Connect AI Assistant
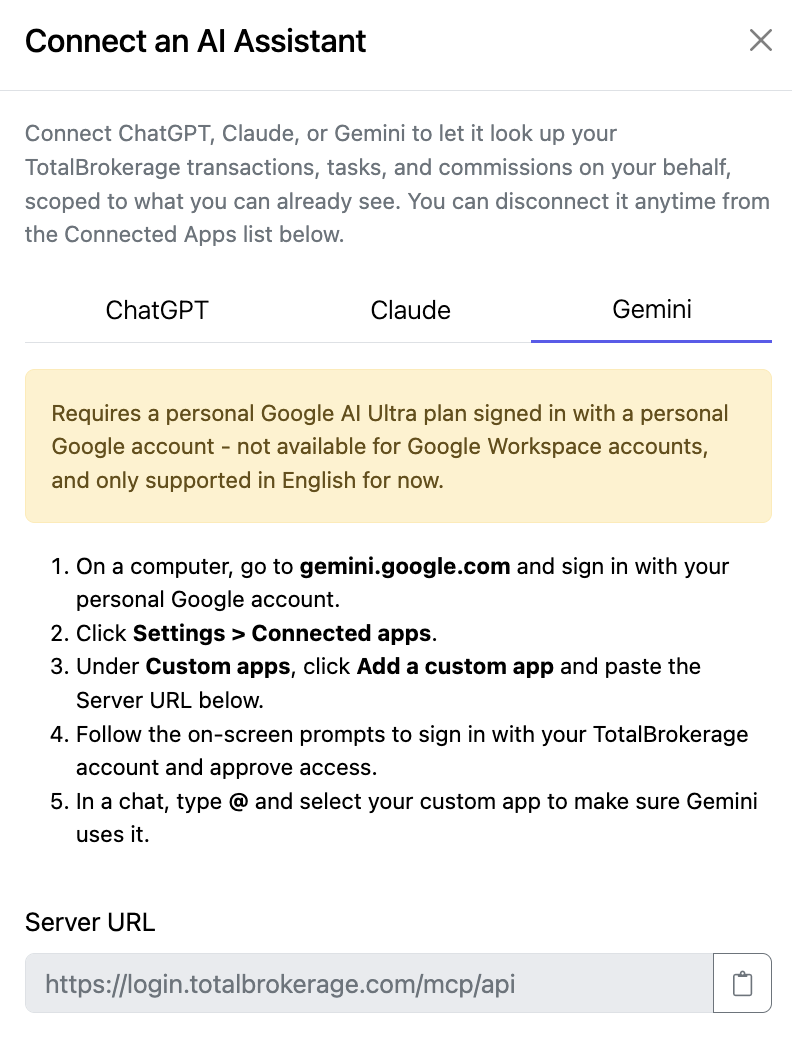
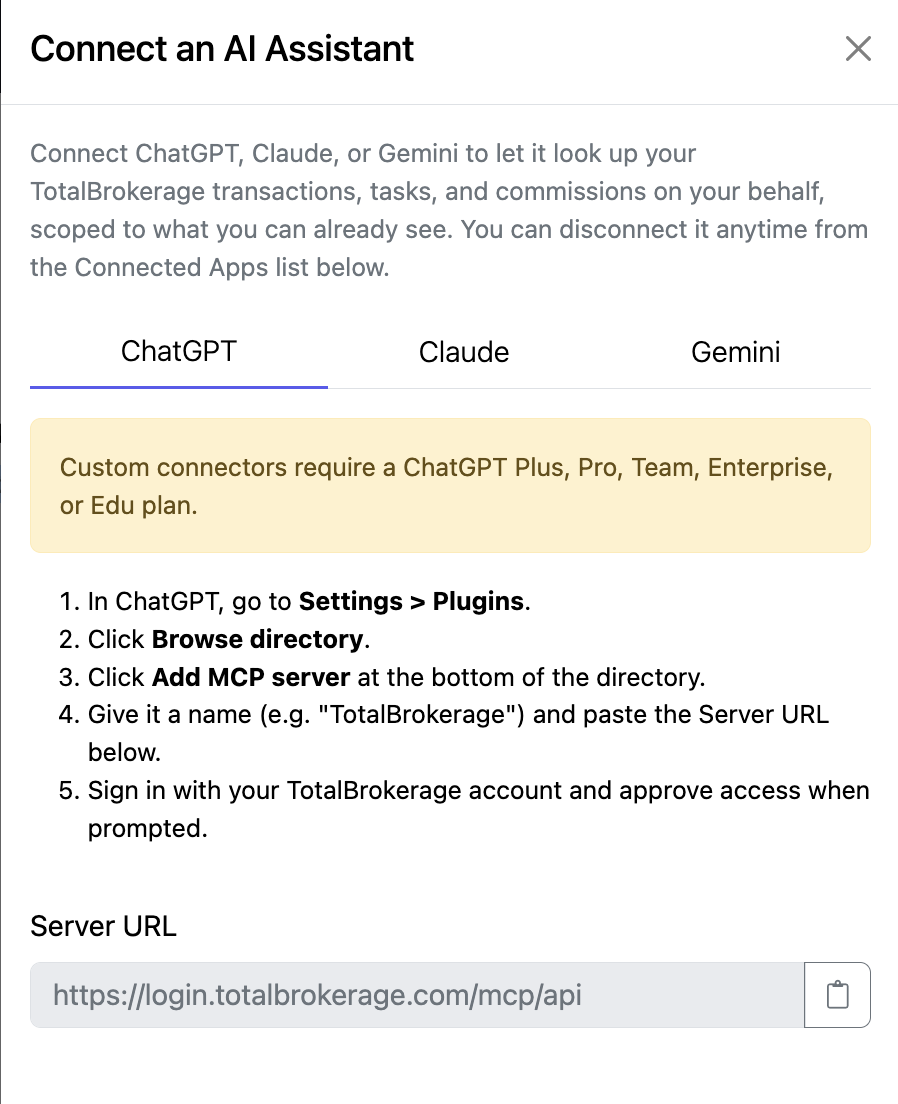
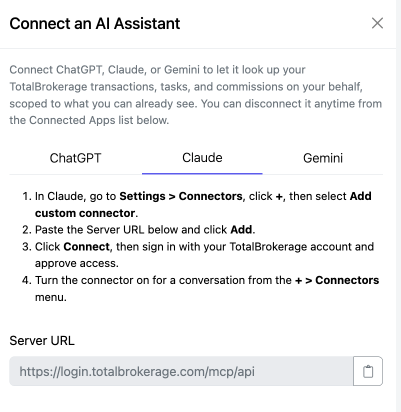
Choose your connection and follow the instructions.
NOTE: Custom connectors require a ChatGPT Plus, Pro, Team, Enterprise, or Edu plan.
ChatGPT
Claude
Gemini