

HELP CENTER / ACCOUNTS
Find and organize
your accounts
Search for an Account by name, email address, or phone number. Use filters to narrow the results, choose the columns you need, and save a Search View to return to the same setup later.
For users with access to Setup → Accounts · Account access depends on your permissions
Before you begin
Sign in to TotalBrokerage and open Setup → Accounts. If Accounts is missing from your menu, ask your brokerage administrator to check your access. Review any filters already applied; a saved view may change what appears.
STEP 1
Search for an Account
Use General Search when you know the account’s name, email address, or phone number.
- Enter a name, email address, or phone number in the search bar.
- Select Search.
- Select the account’s name in the results to open its account page.
The All Accounts tab shows account counts. In the example, 18/61 represents enabled accounts and the allowed account limit. Your brokerage’s numbers will differ.
Check the Enabled filter when looking for a disabled account. Select an existing Enabled: Yes filter to change it to No, then select Update and Apply. Remove the Enabled filter to include both enabled and disabled accounts.

Account Search: search by name, email address, or phone number, and review the applied filters. Select the screenshot to open the full-size image.
STEP 2
Narrow the results with filters
Use Filtered Search to find accounts that meet specific criteria.
- Select Add Filter.
- Use Filter Quick Search or select a category: All, General, Account Detail, or Date.
- Select a field, enter or choose the criteria, then select Add.
- Add any other filters you need. Select Apply at the bottom of the panel to update the results.
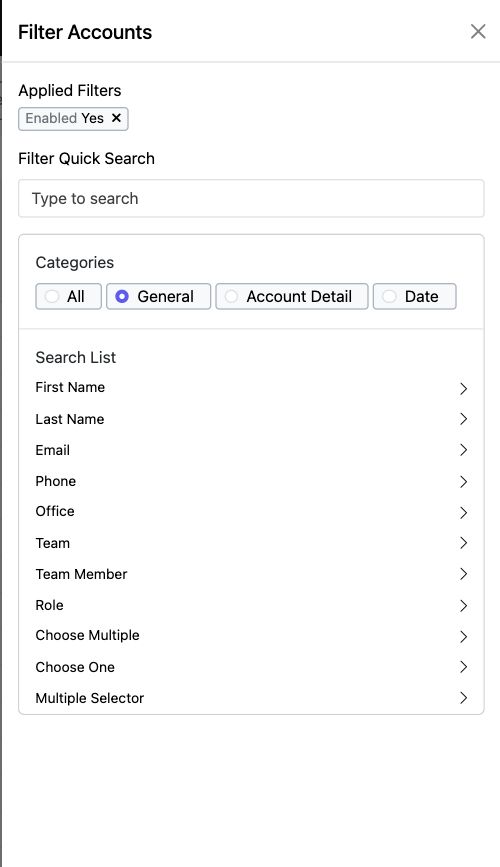
Select General to see account filters. Use Apply at the bottom of the panel when your criteria are ready. Select the screenshot to open the full-size image.
General filters include First Name, Last Name, Email, Phone, Office, Team, Team Member, and Role. Available Account Detail and Date fields depend on your brokerage’s setup.
Filter by role: Select Role, choose Brokerage, Office, or Team, and select the relevant role. For office or team roles, use has roles for: to narrow the search to the office or team you need. Select Add, then Apply.
Filter by team membership: Select Team Member and choose with role assigned, with no role assigned, with or without role assigned, or not on a team. Select Add, then Apply.
To learn how custom fields are created, see Adding Account Details.
STEP 3
Choose and arrange your columns
Use Column Configuration to control which details appear in the results.
- Select the gear icon above the results table.
- On Reorder, drag the handle to the left of a column name to change its position. Use Sort By to choose a field and sort direction.
- On Add / Remove, select the checkboxes for the columns you want and clear those you do not need.
- Select Save to apply the configuration, or Save as Default to save it as your default column configuration.
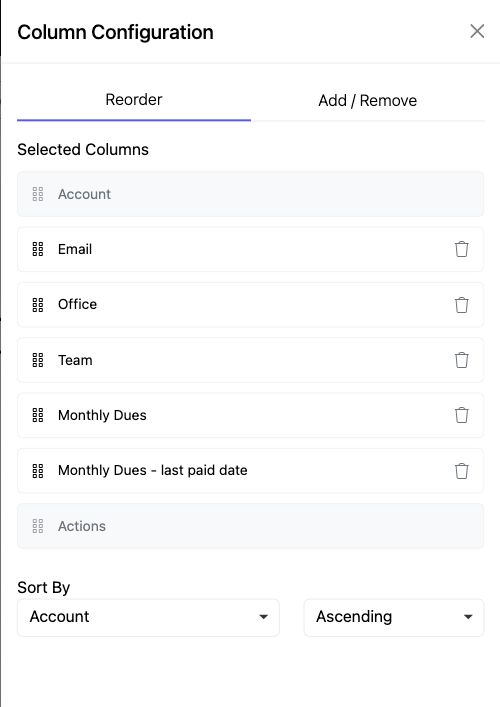
Reorder columns with the drag handles, or use Add / Remove to choose fields. Sort By controls the sort field and direction. Select the screenshot to open the full-size image.
Columns are the fields across the results table. Search View tabs are saved page setups; they are managed separately below.
STEP 4
Save and reuse a Search View
A Search View remembers the page setup so you can return to it without rebuilding your search.
Views save your search text, filters, options, columns, sorting, and rows per page. Loading a view replaces those settings with the saved setup.
- Apply your search and filters, arrange the columns, and choose your sorting and rows per page.
- Select the Search Views bookmark icon beside the view tabs.
- Select Add New View.
- Review Current View and enter a name under Save this view as.
- Optional: select Make this my default view. To add a tab for quick access, select Show on the toolbar and choose a Color.
- Select Save at the bottom of the panel.
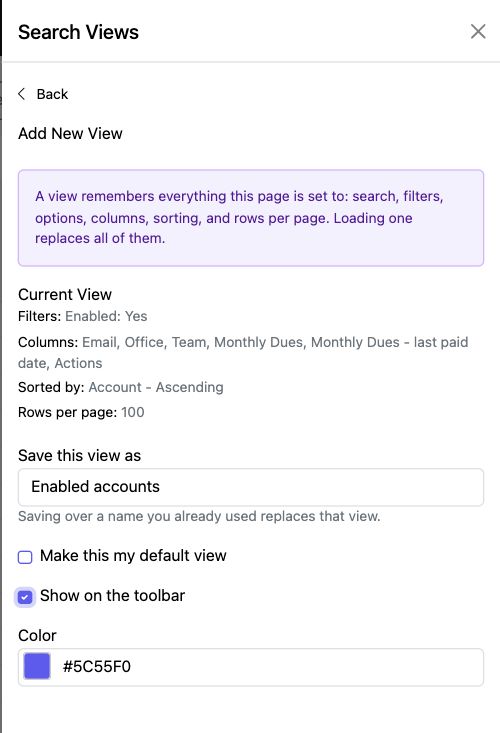
Show on the toolbar reveals the Color setting. Select Save at the bottom of the panel when finished. Select the screenshot to open the full-size image.
Use a saved view: Select its toolbar tab, or open Search Views and select the view’s name. Only views shown on the toolbar appear as tabs.
Manage views: In Search Views, use the arrow beside a view to inspect its saved settings. The pin controls toolbar placement, and the star controls the default view. Select Save after changing these settings.
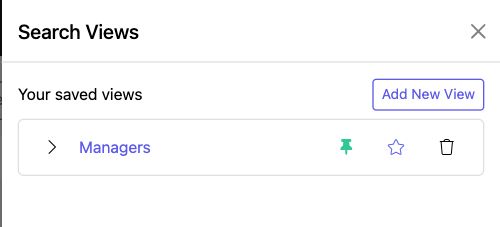
Search Views: expand a view to inspect it, select its name to load it, or use the pin and star controls. Select the screenshot to open the full-size image.
Update a saved setup: Load the view, change the page settings, then open Search Views → Add New View and save with the same name. The form warns that saving over a name you already used replaces that view. Use a different name to keep both setups.
If you get stuck
An account is missing from the results
Review the search text and applied filters, especially Enabled, Office, Team, and Role. A saved view can restore filters you were not expecting.
My columns or filters changed after loading a view
Loading a Search View restores the complete saved page setup, including columns and sorting. Adjust the setup and save it under a new name, or use the same name to replace the existing view.