
You can manage documents within a transaction using batch operations and folders. These features help you organize documents and save time when making changes to multiple documents.
Batch Operations
There are three batch operations available:
Move All To Folder: Moves all selected documents into a specified folder.
Mark All Signed: Marks all selected documents as signed.
Archive All: Moves all selected documents to the Archived Documents folder, located in the lower section of the page.
How to Perform Batch Operations
Open the transaction and navigate to the Documents tab.
Use the checkboxes on the left side of the table to select one or more documents.
Click the Operations dropdown button.
Select the desired action from the dropdown list and follow any prompts to complete the operation.
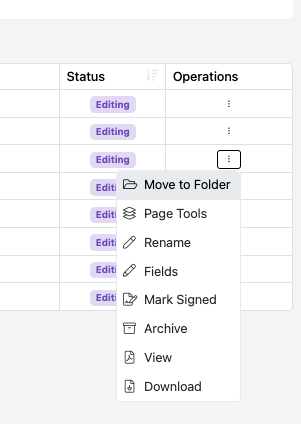
Move to Folder

Creating and Managing Folders
You can create additional folders within a transaction to keep your documents organized. Once you have created your folders, you can move documents between them using either the Move to Folder option in the Operations menu or the drag-and-drop feature.
How to Create a New Folder
Open the transaction and navigate to the Documents tab.
Select the document or documents you want to move using the checkboxes on the left.
Go to Operations and select Move to Folder.
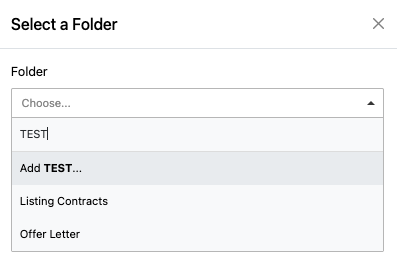
Click inside the box labeled Choose.
A list of previously created folders will appear. Select an existing folder or type in a new folder name to create one.
Click Save at the bottom of the window to complete the action.
How to Move Documents Between Folders
Open the transaction and navigate to the Documents tab.
Locate the document you want to move.
Click and hold the icon to the left of the document name.
Drag the document to the folder where you want it to appear, then drop it into place.
This allows you to organize your transaction documents quickly and easily without having to move each document through the Operations dropdown.