Creating Commission Plans and Fee Plans is an essential step in setting up accurate payout structures for your brokerage. This guide walks you through how to create, configure, and manage both types of plans so you can ensure your transactions calculate commissions and fees correctly every time.
Below you will find the following instructions:
Commission Plan
Fee Plan
Notifications: Commission Notifications help managers stay informed when an agent advances to a new commission tier.
To create a brokerage-wide plans, click on “Setup” and then “Commissions” from you dashboard.

View your Commission & Fee Plans by clicking on the type.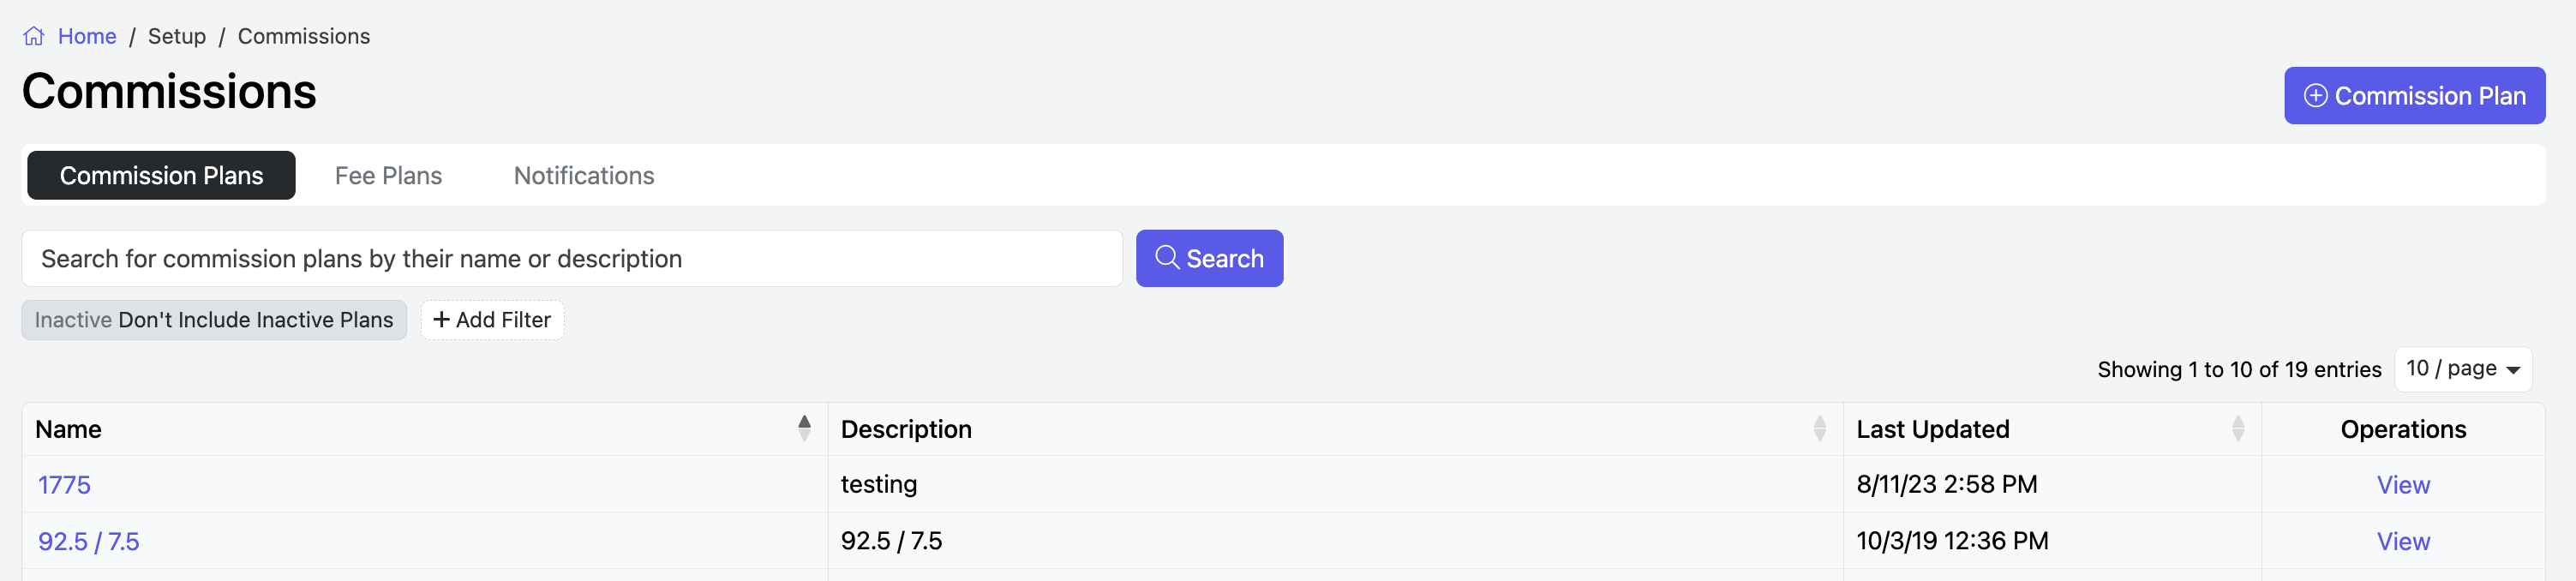
Change the number of plans that you want to see by clicking the Show dropdown.

Click the disc icon to Save your view.

Sort/Filter your plans by clicking + Add Filter.
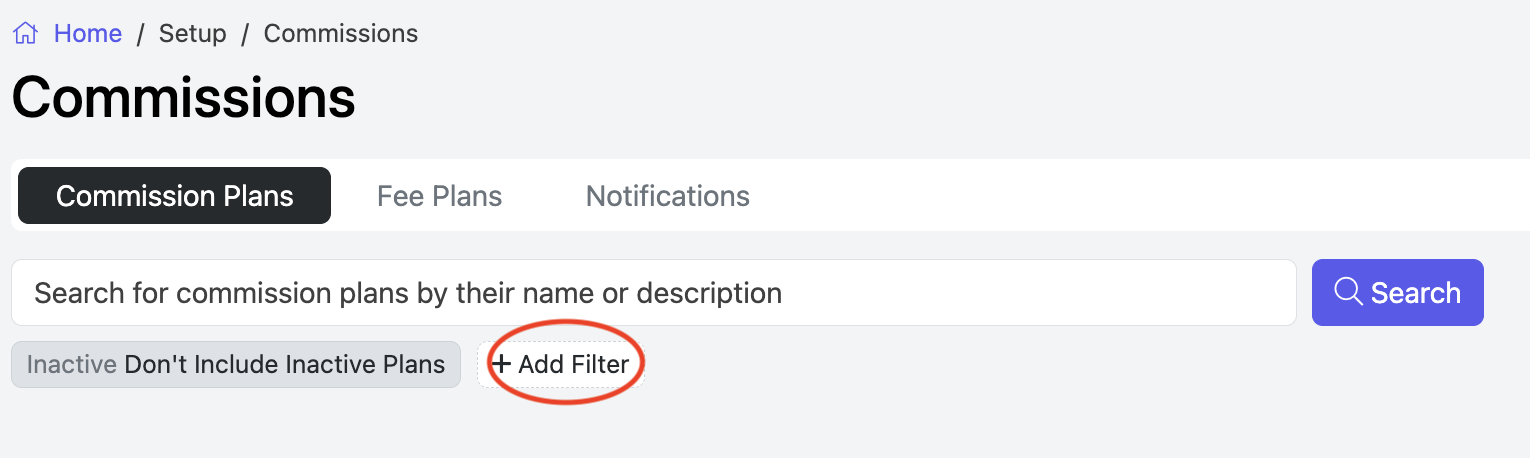
A drawer will open to the right where you can make your selections.

Click Apply when finished.

ADD A NEW COMMISSION PLAN
To add a new commission plan, click “Actions” at the top-right corner of the page and select
“+ Commission Plan.”

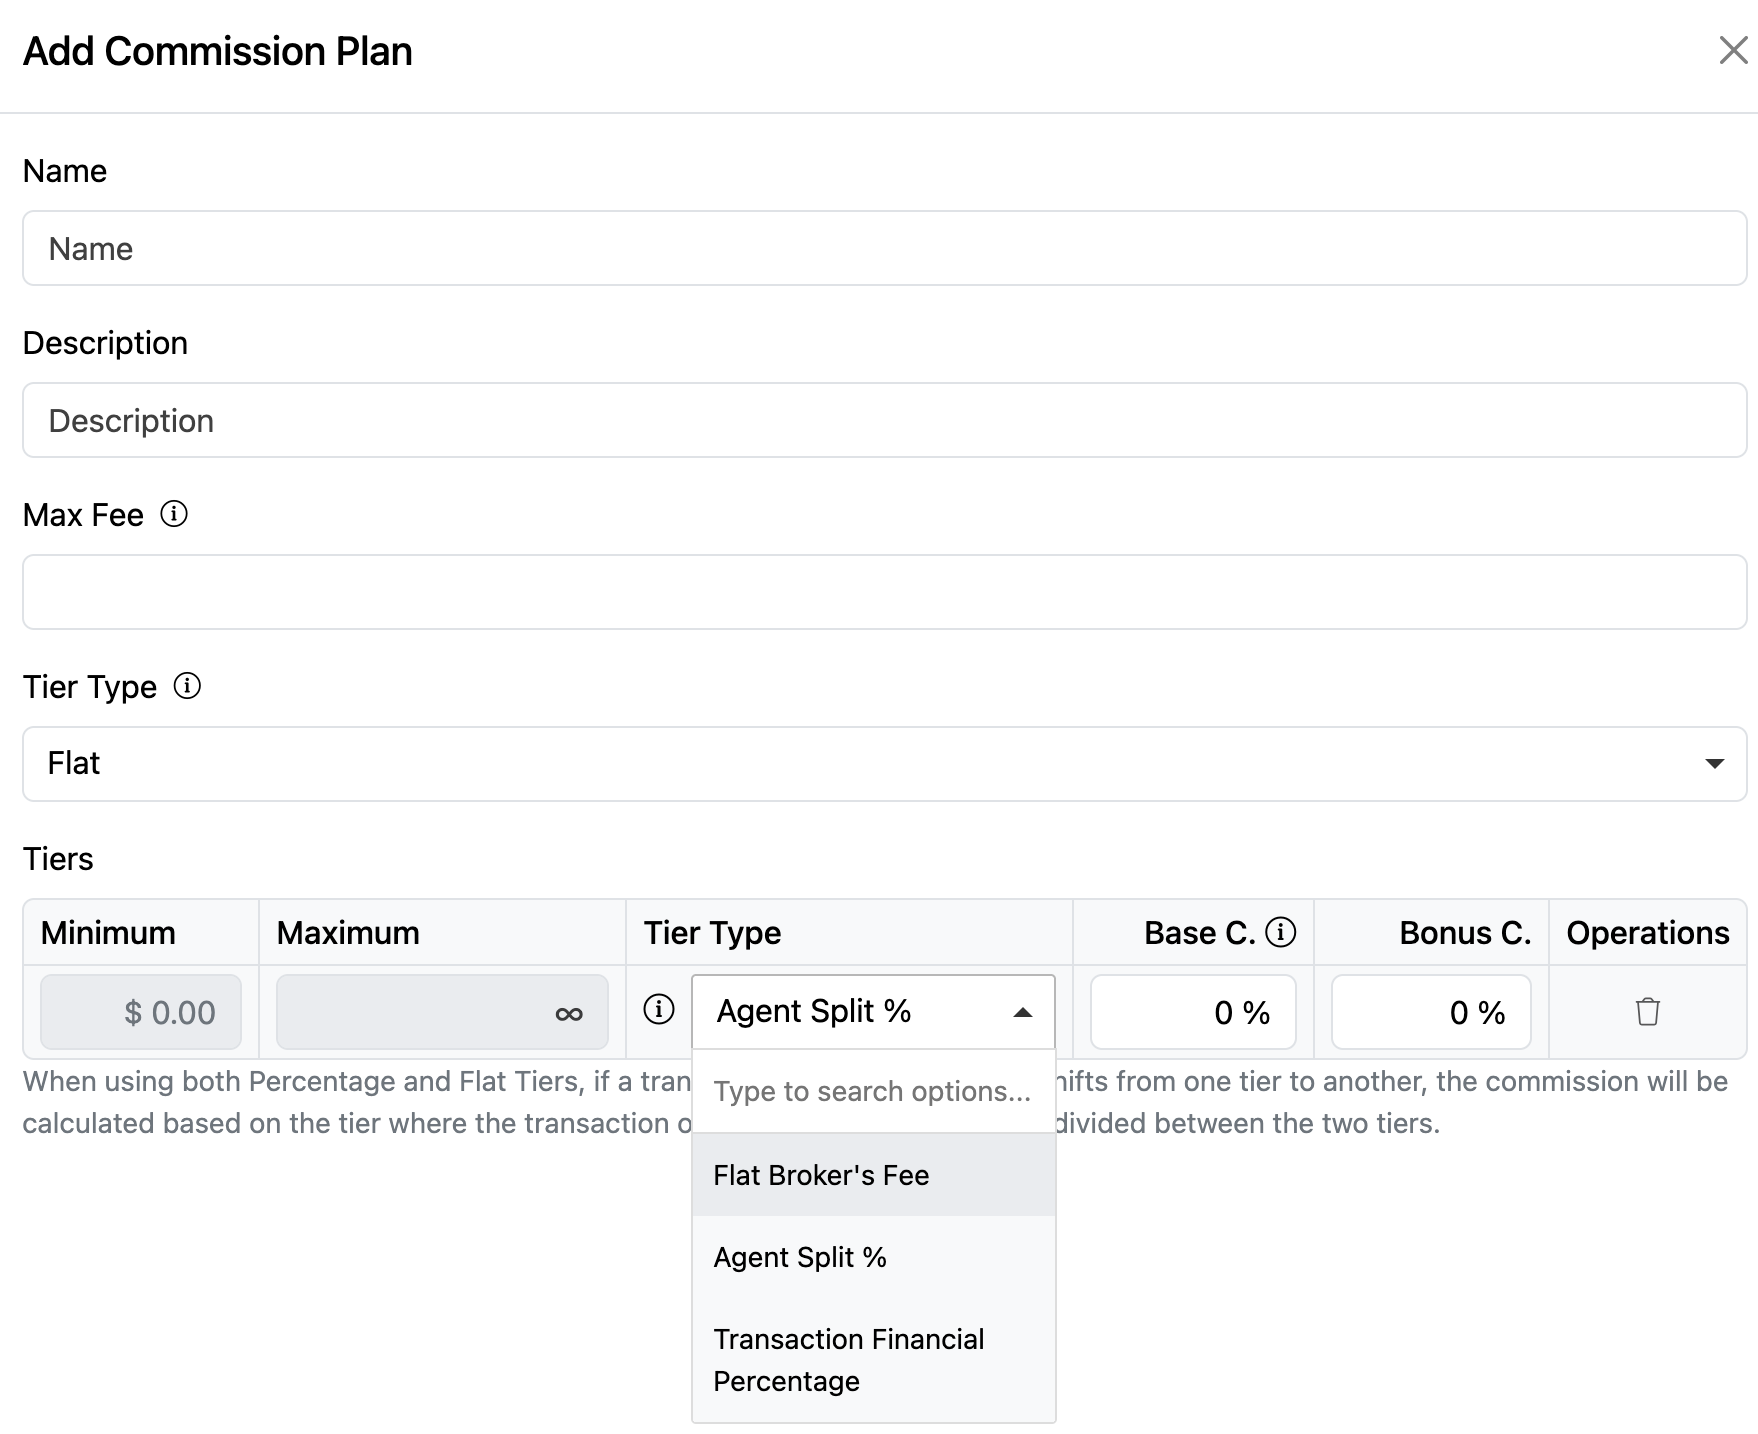
A drawer will open to the right where you can configure the details of the Commission Plan:
- Name: Choose a name for the plan.
- Description: Optionally add a description if you’d like to provide more detail.
- Max Fee: You can enter an optional maximum fee to cap the brokerage fee per transaction. If a Max Fee is entered, the transaction will only allocate up to that amount to the Brokerage. For example, you could create a plan with a 50/50 split until the Brokerage reaches $500; any remaining amount will then go to the agent.
- Tier Type: Select Flat or Tiered
Flat: the agents receive the same split across all transactions
Tiered: will determine their split from contributions on prior transactions. (Use this type if your plans have a cap)

Type: FLAT
Enter the following:
- Name
- Description
- Max Fee (if applicable)
- Tier Type: Flat
- Tiers: Make your selection from the dropdown for Tier Type
- Agent Split Percentage: This will allow you to enter the percentage of the deal that is going to the agent.
- Flat Broker's Fee: This will allow you to enter a flat amount of income coming into the brokerage per transaction.
- Transaction Financial Percentage: Choose this option to set the agent's payout as a percentage of a specified financial value. For instance, you could set it to 0.1% of the Sales price. Upon selection, specify the relevant financial value from the dropdown menu provided.
- Base Commission: Enter the % or Flat Amount
- Bonus Commission: Enter the % or Flat Amount
- Save
Type: TIERED - In each tier, you can specify the agent's split that applies to the base commission and the agent's split that applies to the bonus commission. You can choose if each tier is an agent split percentage, a flat broker's fee, or a percentage of a financial value.
Enter the following:
- Name
- Description
- Max Fee (if applicable)
- Tier Type: Tiered
- Based On: Select from the dropdown:
- Gross Commission Before Split
- Agent Gross Commission
- Broker Commission - broker's income from a split of an agent's transaction
- Value of Financials - amount of a transaction financial from the financial tab of a transaction
- Click in the box to select the Financial Information (Sale Price, Rent for Full Term, etc). If multiple financials are specified, the sum of their values will serve as the total contribution for a transaction.
- Value of Current Transaction Financial - based exclusively on individual transactions. By choosing this option, your commission structure will be dedicated to each transaction's chosen value, untouched by other deals.
- Number of Transactions
- Funding Date: This allows us to determine at which the transaction can be recognized as funded and the agents contribution is complete. (i.e. Closing Date or Lease Execution Deadline).
- Bonus Commission Counts Toward Agent Contribution - If this is checked any bonus commission from this transaction will factor in as well.
- Resets on Anniversary Date - Check this box to apply the plan to all transactions funded after the agent’s most recent anniversary date. Once enabled, you’ll be able to enter the anniversary date when choosing the agent’s plan.
- Base Commission:
- Enter the Maximum $
- Choose the Tier Type:
- Agent Split Percentage: This will allow you to enter the percentage of the deal that is going to the agent.
- Flat Broker's Fee: This will allow you to enter a flat amount of income coming into the brokerage per transaction.
- Transaction Financial Percentage: Choose this option to set the agent's payout as a percentage of a specified financial value. For instance, you could set it to 0.1% of the Sales price. Upon selection, specify the relevant financial value from the dropdown menu provided.
- Bonus Commission: Enter the % or Flat Amount that's applied to any Bonus Commission
- Click +Add a Tier to add additional levels
- Save
NOTE: if different tier types are used within the same commission plan, the commission for a transaction will be calculated based on the tier type in effect when the transaction commenced. The commission calculation will not be split between tiers, even if the transaction moves to a different tier later on.
If you want to remove a tier, click on the trash icon under Operations.
Your new commission plan for the brokerage will now be added.
To view your plans, go to Setup > Commissions.
To Disable a plan, click View and then click the disable button at the top right.
When doing so, you will have the option to remove this plan from all the accounts currently using it.
ADD A NEW FEE PLAN
Click the Fee Plans tab

Click +Add Fee Plan
A drawer will open to the right.

Enter the information for the plan.
- Name
- Description
- Person type(s) & Transaction type(s) - The fee plan will take effect only when at least one of the specified person types or transaction types matches the transaction. If no person types or transaction types are selected, the fee plan will automatically apply to all transactions for the agent.
If you want to add more items, click +Add a line item.
Click “Save” when you’re done.
To view your plans, go to Setup > Commissions > Fee Plans.
To make Changes to the Fee Plan, click on the plan name.
Make your changes and Save.
Click Apply Fee Plan to update all accounts.


To Disable a Fee Plan, click View and then click the disable button at the top right.
After seeing this message, click Okay at the bottom right.


NOTIFICATIONS
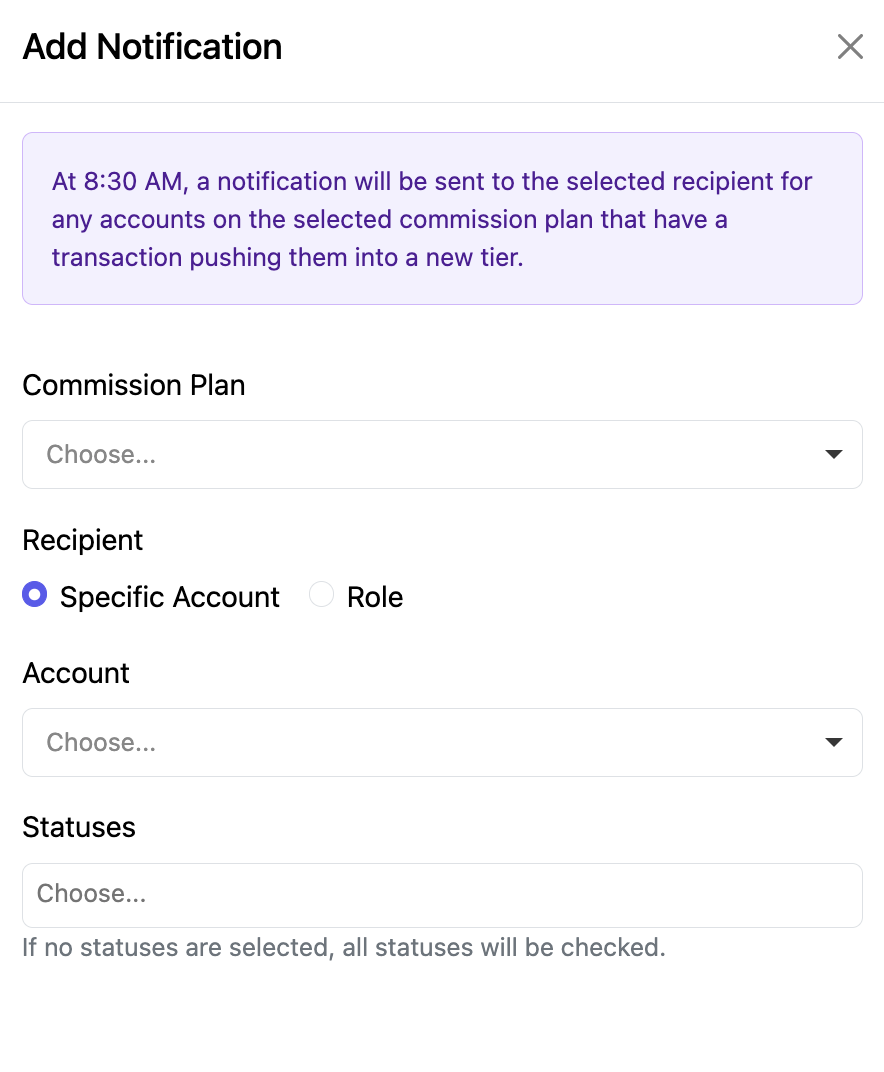
Navigate to Setup > Commissions > Commission Notifications to create a notification.
Managers can configure notifications to be sent to one or more recipients whenever a transaction moves an account into a new tier on a selected commission plan notification, for example, when an agent Caps.
This feature makes it easy to monitor tier changes and ensure the appropriate team members are informed when an agent reaches the next level of their commission plan.
- Click +Notification
- Choose the commission plan
- Select the recipients who should be notified
- Save

Select either a specific Account to receive the notification, or choose a Role.
When a role is selected, all accounts assigned to that role will receive the notification whenever an agent on the selected commission plan advances to a new commission tier.
You can also select the Transaction Status(es) that will trigger the notification.
If no transaction statuses are selected, notifications will be generated for transactions in all statuses.